NFTs
Intro
An NFT, or non-fungible token, represents a unique digital asset that cannot be replaced or exchanged on a one-to-one basis. NFTs can take many forms, such as JPEG images, music, or digital artwork. For example, as an artist, you could create a 3-minute YouTube video by combining your images and music. Once created, you can sell this video as an NFT, potentially at a great price if it offers value to the community. It's similar to purchasing art at a gallery, but it's a much simpler and more accessible process.
Prerequisite
Follow the Getting started guide to install required libraries, receive test network UNQ tokens, and initialize SDK.
At this point, you need to know how to manage collections. Learn how to do this in the Working with collections guide.
Getting started
Let's start with a minimum example. At this point, we assume you already minted your NFT collection, and you have its collectionId.
const mintNftTx = await unique.token.mintNFTs({
  collectionId,
  tokens: [
    {data: {image: 'https://gateway.pinata.cloud/ipfs/QmTkhTg5S5zrqJL3UsKtyiFi8fcMT3Cao9uKtadp3Ckh7m'}},
    {data: {image: 'https://gateway.pinata.cloud/ipfs/QmQRUMbyfvioTcYiJYorEK6vNT3iN4pM6Sci9A2gQBuwuA'}},
  ]
});

const [nft1, nft2] = mintNftTx.result;

console.log('Minted tokens:', nft1.tokenId, nft2.tokenId);
Check your newly created tokens on Unique Scan
Querying tokens
Get token by ID
Retrieve detailed information about a specific token:
const token = await unique.token.get({
  collectionId: 1,
  tokenId: 1
});

console.log(token);
The response includes:
{
  collectionId: 1,
  collectionAddress: "0x...",     // Ethereum mirror address of collection
  tokenId: 1,
  owner: "5GrwvaEF...",           // Direct owner (could be another token)
  topmostOwner: "5GrwvaEF...",    // Real account owner (top of nesting hierarchy)
  symbol: "COL",
  properties: [...],
  schemaName: "unique",
  schemaVersion: "2.0.0",
  image: "https://...",
  attributes: [...],
  decodingError: null
}
Query with nested children
If the token has nested children, you can retrieve them in a single query:
const token = await unique.token.get({
  collectionId: 1,
  tokenId: 1,
  withChildren: true
});

if (token.children && token.children.length > 0) {
  console.log('This token owns', token.children.length, 'child tokens');
  token.children.forEach(child => {
    console.log(`Child: ${child.collectionId}:${child.tokenId}`);
  });
}
Check possible actions
Before attempting an operation, you can check what actions are permitted for a token:
const actions = await unique.token.possibleActions({
  collectionId: 1,
  tokenId: 1,
  sender: account.address,
  transferTo: recipientAddress  // optional: check if transfer to specific address is possible
});

console.log(actions);
Returns:
{
  burn: true,                    // Can the sender burn this token?
  transfer: true,                // Can the sender transfer this token?
  nest: false,                   // Can the sender nest this token?
  unnest: false,                 // Can the sender unnest this token?
  changeProperties: ['A', 'B']   // Which properties can the sender modify?
}
This is useful for:
- Enabling/disabling UI buttons based on permissions
- Validating operations before submission
- Displaying user capabilities
Example usage:
const { burn, transfer } = await unique.token.possibleActions({
  collectionId,
  tokenId,
  sender: account.address
});

if (!transfer) {
  console.log('Transfer is not allowed for this token');
  return;
}

// Proceed with transfer
await unique.token.transfer({ collectionId, tokenId, to: recipient });
Token properties and attributes
In the collections section, we've learned basics about token properties. Let's do a quick recap.
- Token property is a key/value pair
- The list of possible keys, as well as their mutability, are set on the collection level
Properties
Now, let's create a token and set its properties.
// This is an example of a collection created in the collection section
const {result} = await sdk.collection.create({
  name: "Test",
  description: "Test collection",
  symbol: "TST",
  info: {cover_image: {url: coverImage}},
  tokenPropertyPermissions: [ // <--- set token property permissions here
    {key: 'A', permission: {mutable: true, collectionAdmin: true, tokenOwner: true}},
    {key: 'B', permission: {mutable: false, collectionAdmin: false, tokenOwner: false}},
    {key: 'C', permission: {mutable: false, collectionAdmin: false, tokenOwner: true}},
  ]
});

const nftImage = "https://gateway.pinata.cloud/ipfs/QmTkhTg5S5zrqJL3UsKtyiFi8fcMT3Cao9uKtadp3Ckh7m";

const mintNftTx = await sdk.token.mintNFTs({
  collectionId: result.collectionId,
  tokens: [
    {data: {image: nftImage}, properties: [{key: "A", value: "value A"}]},
  ]
});
In the example above, we created only one NFT and set only one property—A.
Later, the NFT owner can specify property C.
await sdk.token.setProperties(
  {
    collectionId,
    tokenId: mintNftTx.result[0].tokenId,
    properties: [{key: "C", value: "value C"}]
  }
);
But because of permissions of property B it could have been set only during the minting. So it will remain unset forever.
Attributes
Properties are a part of a token on a core blockchain level. They can be set with arbitrary metadata, i.e., schema name and version, royalties, etc.
Attributes define token traits and are not a part of a blockchain core. Examples of attributes could be a power or experience for a gaming character. In Unique Metadata, attributes are stored in tokenData property of an NFT.
Let's mint some extra tokens with attributes.
const mintNftTx = await sdk.token.mintNFTs({
 collectionId: result.collectionId,
 tokens: [
  {
    data: {
      image: nftImage,
      attributes: [ // <--- setting attributes
        {trait_type: "power", value: 50},
        {trait_type: "experience", value: 300}
      ]
    }
  },
 ]
});
Now, let's have a look at the newly created token.
const nft = await sdk.token.get({
 collectionId: result.collectionId,
 tokenId: 1
});

console.log(nft.attributes)
The output:
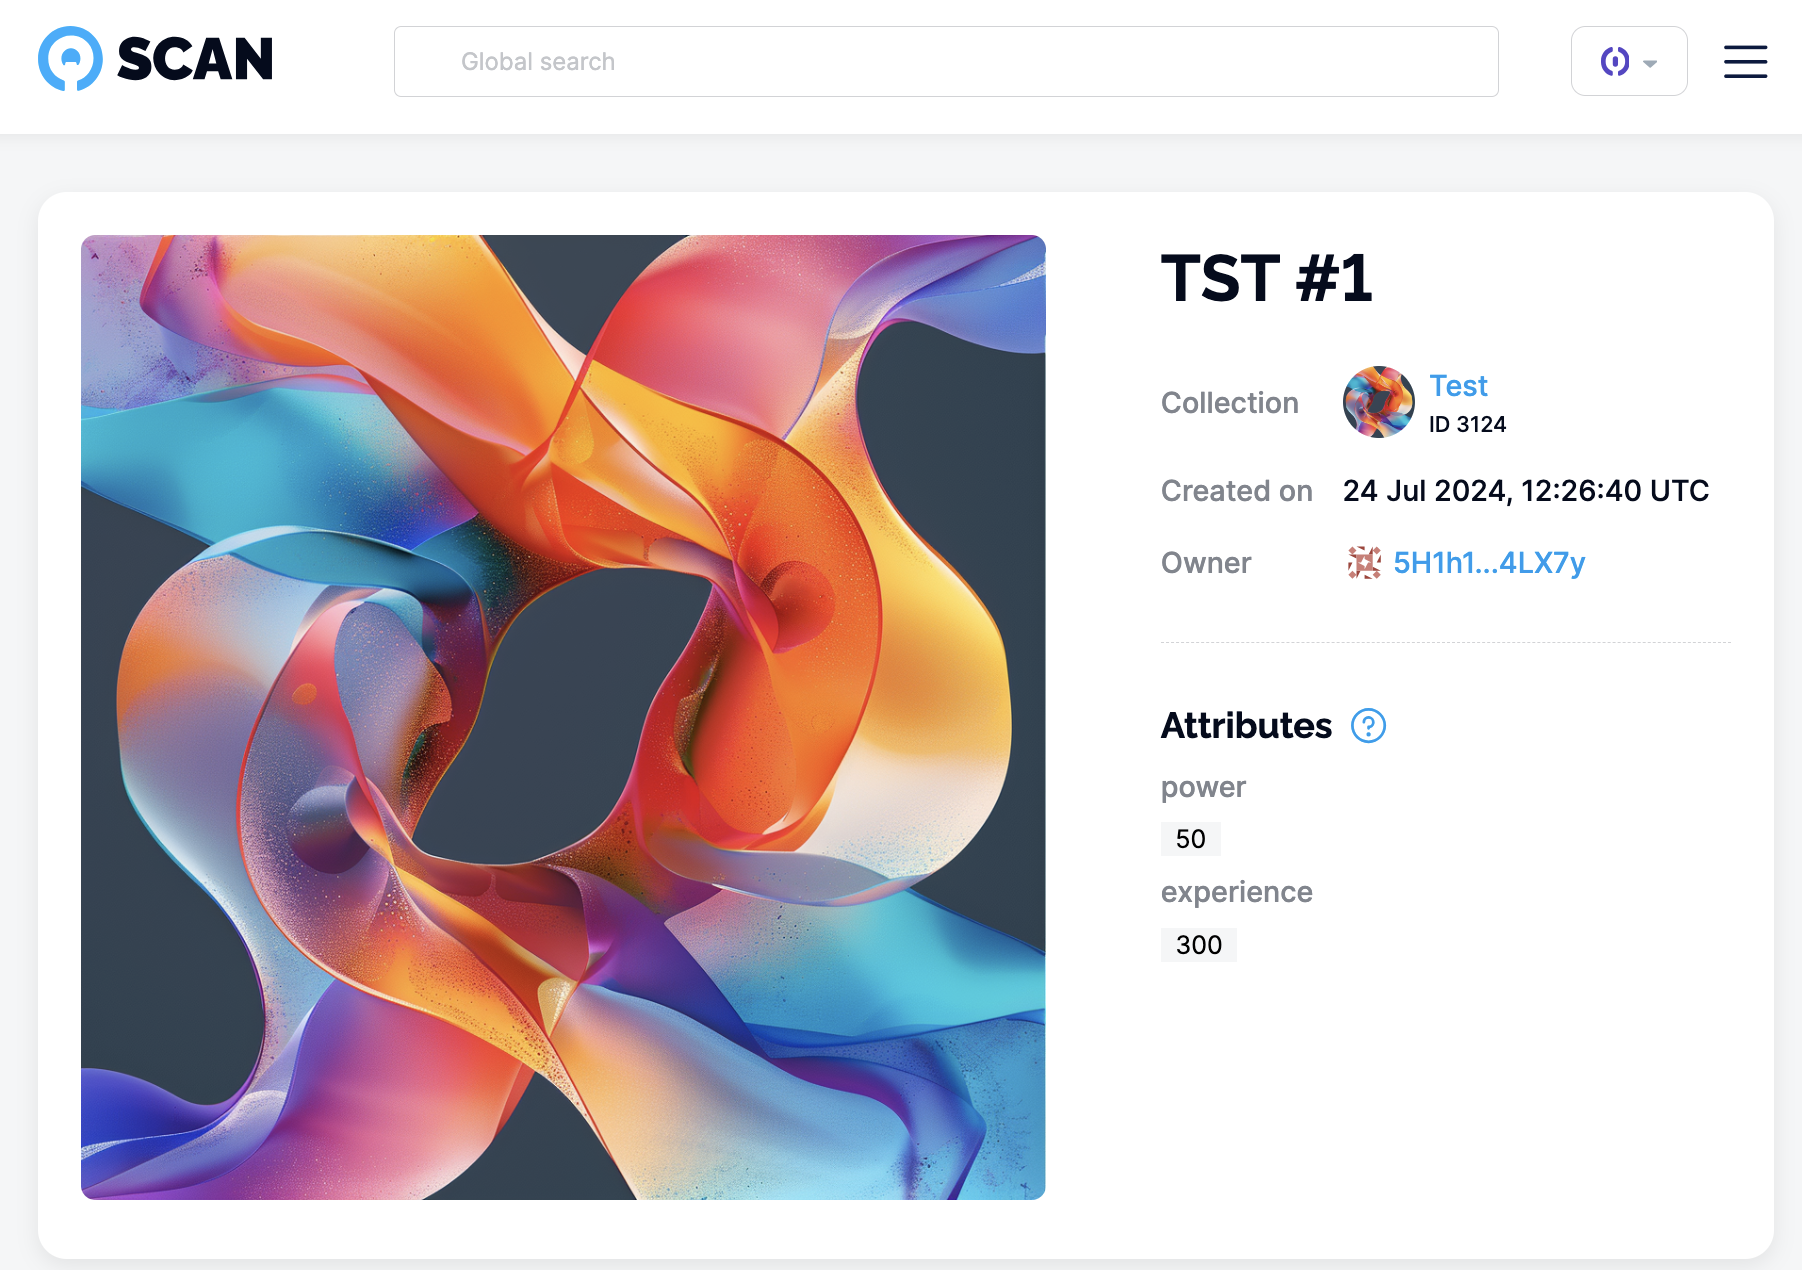
attributes: [
 { trait_type: 'power', value: 50 },
 { trait_type: 'experience', value: 300 }
],
And that is how your token will be displayed on Unique Scan and other wallets.
Properties and attributes mutation
In the collection section, we've learned that token properties can be set as mutable by the collection admin or token owner.
Let's make a quick recap of how it can be done. Below, we set mutability for token property A:
await sdk.collection.create({
  ...
  tokenPropertyPermissions: [
    // This is how we specify token properties' mutability during the collection creation
    {key: 'A', permission: {mutable: true, collectionAdmin: true, tokenOwner: true}},

  ...
If the property is specified as mutable, it can be set after the token has been created.
await sdk.token.setProperties({
  collectionId,
  tokenId,
  properties: [{ key: "A", value: "New value" }],
});
As far as deleted:
await sdk.token.deleteProperties({
  collectionId,
  tokenId,
  keys: ['A'],
});
Attributes are part of tokenData property which is by default mutable for collection admin. You can override it during the collection creation.
The SDK provides the following method for attribute mutation:
await sdk.token.updateNft({
  collectionId,
  tokenId,
  data: {
    attributes: [
      {
        trait_type: "Power",
        value: 42,
      },
    ],
    image: "https://your-new-image.here/image.png",
  },
});
Transfer
The token owner can transfer its token if the collection limits do not restrict token transfer.
await unique.token.transfer({
  collectionId,
  tokenId,
  to: "5GrwvaEF5zXb26Fz9rcQpDWS57CtERHpNehXCPcNoHGKutQY"
});
Collection admin privileges
If the collection was created with ownerCanTransfer: true, the collection owner and admins can transfer any token without approval using transferFrom.
It is also possible to approve the transfer for another account.
// SDK's default account approves NFT for Alice
const approvalTx = await sdk.token.approve({
  collectionId,
  tokenId,
  spender: alice.address,
});

// Let's check token is approved
const { isApproved } = await sdk.token.getApproved({
  collectionId,
  tokenId,
  spender: alice.address,
});

// Now, Alice can transfer approved token
const transferFromTx = await sdk.token.transfer(
  {
    to: alice.address,
    collectionId,
    tokenId: token1.tokenId,
    from: account.address,
  },
  {
    signerAddress: alice.address,
  },
  // This transaction made by Alice
  alice,
);
Burn
The token owner can destroy its token if the collection limits do not restrict token burn.
Burn your own token
const result = await unique.token.burn({
  collectionId,
  tokenId,
});

console.log('Burned token:', result.tokenId);
console.log('Amount burned:', result.amount);
Burn from another account (with approval)
If a token is approved for an account, that account can burn the token without first transferring it:
// Step 1: Owner approves Alice to manage the token
await unique.token.approve({
  collectionId,
  tokenId,
  spender: alice.address,
});

// Step 2: Alice burns the token directly from owner's account
await unique.token.burnFrom(
  {
    collectionId,
    tokenId,
    from: owner.address,  // The token owner's address
    amount: 1             // Amount to burn (for fungible/refungible tokens)
  },
  { signerAddress: alice.address },  // Transaction signer
  alice                               // Account object with signer
);
Collection admin privileges
If the collection was created with ownerCanTransfer: true, the collection owner and admins can burn any token without approval using burnFrom.
The burnFrom method is particularly useful for:
- Marketplace operations: Burn tokens when removing listings
- Game mechanics: Burn items from player inventories
- Automated systems: Allow smart contracts or services to burn approved tokens
TIP
For NFTs, amount is always 1. For fungible and refungible tokens, you can specify the amount to burn.
Nesting
In Unique Network tokens can own other tokens through a mechanism called nesting. In the collection section you've learned how nesting can be configured on the collection level.
Nesting tokens
Nest one token inside another:
const result = await unique.token.nest({
  parent: { collectionId, tokenId: parentTokenId },
  nested: { collectionId, tokenId: childTokenId }
});

console.log('Child token owner:', result.owner);      // Will be the parent token address
console.log('Topmost owner:', result.topmostOwner);  // Will be the real account owner
After nesting, the child token's ownership structure changes:
- owner: The parent token (represented as an address)
- topmostOwner: The real account that owns the parent token
Understanding ownership hierarchy
When tokens are nested, there's a distinction between direct owner and topmost owner:
// Create a nesting hierarchy: Account → Token A → Token B
await unique.token.nest({
  parent: { collectionId, tokenId: tokenA },
  nested: { collectionId, tokenId: tokenB }
});

const tokenB = await unique.token.get({
  collectionId,
  tokenId: tokenB
});

console.log('Direct owner:', tokenB.owner);         // Token A's address
console.log('Topmost owner:', tokenB.topmostOwner); // Your account address
If you transfer Token A to another account, Token B's topmost owner automatically updates:
await unique.token.transfer({
  collectionId,
  tokenId: tokenA,
  to: newOwner.address
});

// Token B's topmostOwner is now newOwner.address
const updatedTokenB = await unique.token.get({ collectionId, tokenId: tokenB });
console.log('New topmost owner:', updatedTokenB.topmostOwner); // newOwner.address
Querying nested structure
Get a token with all its nested children:
const parentToken = await unique.token.get({
  collectionId,
  tokenId: parentTokenId,
  withChildren: true
});

if (parentToken.children) {
  console.log(`Parent token owns ${parentToken.children.length} children:`);
  parentToken.children.forEach(child => {
    console.log(`- ${child.collectionId}:${child.tokenId}`);
  });
}
Unnesting tokens
The topmost owner can unnest tokens, transferring them back to their account:
// Unnest to the topmost owner
await unique.token.unnest({
  nested: { collectionId, tokenId: childTokenId }
});
You can also unnest to a specific address:
// Unnest to a specific address
await unique.token.unnest({
  nested: { collectionId, tokenId: childTokenId },
  to: recipientAddress
});
Burning nested tokens
Leaf node rule
Only leaf node tokens (tokens with no nested children) can be burned. To burn a parent token, you must first burn all its descendants in reverse nesting order.
For example, if you have this nested structure:
Token A3 (root)
├── Token A4
├── Token A5
└── Token B1
    └── Token B2
To burn token A3, you should burn tokens in specific order, for example: B2 → [B1, A4, A5] → A3.
You can use the withChildren query option to check if a token has nested children before attempting to burn it:
const token = await unique.token.get({
  collectionId,
  tokenId,
  withChildren: true
});

if (token.children && token.children.length > 0) {
  console.log('Cannot burn: token has nested children');
  console.log('Must burn these children first:', token.children);
} else {
  // Safe to burn - this is a leaf node
  await unique.token.burn({ collectionId, tokenId });
}
Nesting use cases
Nesting enables powerful composability patterns:
- Gaming: Characters own equipment, vehicles own parts
- Collections: Bundle related NFTs together
- Fractional ownership: A bundle token owns multiple asset tokens
- Hierarchical assets: Company → Department → Assets
Understanding token addresses
In Unique Network, every collection and token has a unique ID that can be mapped to an EVM address. Nesting is implemented as a transfer of the child token to the parent token's address.
The concept of collections and token addresses is particularly useful when working with smart contracts.
:::info Technical note Under the hood, nested tokens are automatically approved for transferFrom by the topmost owner. The unnest method is syntactic sugar - you can also transfer nested tokens directly using the regular transfer method. See Transfer for details. :::